I have found blend shapes quite easy to work with. The technique itself is not overly difficult to get working. However to create the shapes in the first place proved harder than I first thought. I have only used basic shapes for this exercise. However i could have used a lot more detail when modeling the shapes but this would have been more time consuming. What i have used has been ideal to learn with though.
For the film i will make sure that the models are as good as possible. Our film doesn't have speech but i will need to make some awkward shapes none the less. At least now i know how to do it and how to control them.
Im impressed with how well the model can blend between shapes. As long as models have the same topology the shapes will work.
Thursday, 1 December 2011
Wednesday, 30 November 2011
Working Blend shapes and Controls!
This is everything working. It shows me using the sliders to manipulate the face.
Im pleased with my progress in this project and feel i have earnt a very useful skill which will no doubt help me in the future.
Im pleased with my progress in this project and feel i have earnt a very useful skill which will no doubt help me in the future.
Tuesday, 29 November 2011
Controls System
In order to make a control system, I had to find out the best way to do this. Previous rigs ive used such as the Max rig, have a face control system made from groups of sliders. I decided to try this. I found a tutorial showing how this was done and applied it to my own controls. http://www.youtube.com/watch?v=CQ5SFhynSWU

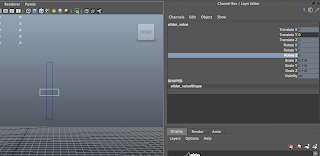
I started off by making the slider shapes from CV curve tool.
 I then had to find the points in which my slider was to move between. As my blend shapes work between 0-1 i used this. 0 being no blend 1 being the whole shape.
Before parenting the two rectangles i had to freeze transformations on the long one. I had previously not done this and when i started trying to move the slider nothing happened.
 So that the slider would not exceed 1 or go below 0 i had to lock the limits which it could move between.

Using the Connection editor i was able to connect the slider to the blend shapes.
I was then able to control the eyebrows by moving the slider

I then continued to make more slider and continued to connect these to various shapes.
So i would know which each was called i created text to label each set of controls.
Im very happy to have got this working. This is the first time ive made any kind of controls. This will come in very useful when it comes to making future rigs.

I started off by making the slider shapes from CV curve tool.

Before parenting the two rectangles i had to freeze transformations on the long one. I had previously not done this and when i started trying to move the slider nothing happened.


Using the Connection editor i was able to connect the slider to the blend shapes.
I was then able to control the eyebrows by moving the slider

I then continued to make more slider and continued to connect these to various shapes.
So i would know which each was called i created text to label each set of controls.
Im very happy to have got this working. This is the first time ive made any kind of controls. This will come in very useful when it comes to making future rigs.
Sunday, 27 November 2011
Blend Shapes
Now i have all shapes I will apply the shape to my base model. I now have a model which can be played with using the sliders in the blend shape editor.
So i would know which each slider is for i needed to name all my shapes.
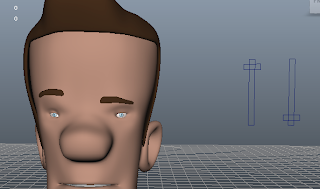
Although this works well and i can keyframe using the editor i still fell like i need a control system.
As it would be good to have the controls on screen with the head. I will however put them on a layer so they can be turned off if needed.
http://vimeo.com/32955399
Although this works well and i can keyframe using the editor i still fell like i need a control system.
As it would be good to have the controls on screen with the head. I will however put them on a layer so they can be turned off if needed.
http://vimeo.com/32955399
Saturday, 26 November 2011
More Shapes
I have now made a number of different shapes.

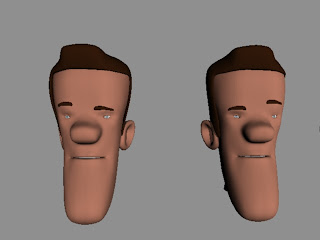
These are the shapes I've made. If working on a head that required more detail. I would have spent a lot longer making the shapes, but because this unit is more about me learning the technique of making the blend shapes and getting them to work with each other I've chosen to leave it like this and concentrate on making working controls.
 The eyebrows move separately allowing for extra expressions.
I was trying to make an O shape here although its not my best work. However for the purposes of this exercise it works.
 By Mixing a number of these shapes together i will be able to make a number of different combinations.
The open and wide positions are often used in speech so i have chosen to make basic versions of those.
 The smile here can be used with the wide as seen above to create a wide smile.
The shape with inflated cheeks can be used for a number of reasons. Im not overly happy with it and given more time i would try and use refrence a bit better.


These are the shapes I've made. If working on a head that required more detail. I would have spent a lot longer making the shapes, but because this unit is more about me learning the technique of making the blend shapes and getting them to work with each other I've chosen to leave it like this and concentrate on making working controls.

I was trying to make an O shape here although its not my best work. However for the purposes of this exercise it works.

The open and wide positions are often used in speech so i have chosen to make basic versions of those.

The shape with inflated cheeks can be used for a number of reasons. Im not overly happy with it and given more time i would try and use refrence a bit better.
Friday, 25 November 2011
Mouth Shapes for Speech
If i was making a fully working head which to be used for speech i would need to make sure that all the shapes required for speech are made. I have been looking into the shapes the mouth makes when making particular sounds or words.
 The image here shows the main expressions used for speech.
I had originally planned to make all of these. However through making just a few so far i have learnt that each shape can be very time consuming. However it will be of good reference for the future, should i ever need a talking character. The ones shown here are very cartoony and show lots of deformation on the characters face shape. The character head i am currently using would not really allow for this nor would it suit the style.

I had originally planned to make all of these. However through making just a few so far i have learnt that each shape can be very time consuming. However it will be of good reference for the future, should i ever need a talking character. The ones shown here are very cartoony and show lots of deformation on the characters face shape. The character head i am currently using would not really allow for this nor would it suit the style.
Thursday, 24 November 2011
First Expressions
I have started making Facial expressions. I've started simple and down each eye blinking. This is something that would definitely be needed on most character rigs. To start i copied the head model and started moving the vertices to create a shut eye. Initially i though i could just mirror the model and use that for the other side. However when it came to making the blend shape with the original. When sliding between the two, all i got was the face being squashed. I tried freezing the transformations in the original position, but thaht didnt work either. Therefore i just used the same method i used for the first side i did.
It now works well and using the slider controls i can create a blink if i move both, or a wink either side by just moving one for the sliders.


It now works well and using the slider controls i can create a blink if i move both, or a wink either side by just moving one for the sliders.


Saturday, 19 November 2011
Detail to the head
Because of some of the facial expressions i wish to make i have had to add some more detail to my head model, I have added Hair, Eyebrows, Teeth and a tongue. The last two are particularly important for when my character has his mouth open. The eyebrows will be used to show expressions such as surprise. The hair was just to give the whole model a more complete look.


Tuesday, 1 November 2011
Facial expressions
In order to understand the shapes which make up facial expressions I have been looking at some reference to help me. I have tried to find reference which shows very extreme posing as that is what's required for our Film.
 Here are two examples of the expressions required in our film. In order to stick to the styling of the film it is important that the 3D version of the character is as close to the storyboard drawings as possible. When drawing them Josh was very consistent in style so i will have to be too with the 3d Character.


So that i am able to understand how each part of the face moving affects the rest i have looked at live action. This is so i can see how for instance the cheeks move when the mouth is opened in a particular way.
I will then be able to apply this to my model so that the expressions look natural


So that i am able to understand how each part of the face moving affects the rest i have looked at live action. This is so i can see how for instance the cheeks move when the mouth is opened in a particular way.
I will then be able to apply this to my model so that the expressions look natural
Monday, 31 October 2011
Applying Blend shapes to a Head
I have now finished modeling a head which i can use to practice on. The head is very similar to the one i will be using for my film, however this head includes eyes, whereas the character in our film only has from his nose down visible. However I feel like it will be useful to learn how to create eye movements such as blinking for future reference.
 Here is the head i shall be using.
I plan to create a number of facial expressions, for now it will be simple shapes such as a smile and frown. This way i will be able to see how much of the mesh I will have to alter in order for the expressions to look right.
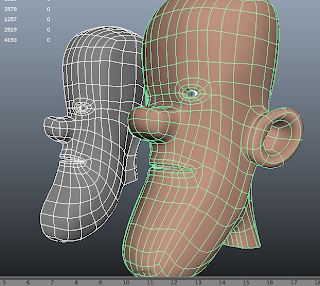 Through further research i have found that the head i had originally created would not be suitable to mold in different shapes. The topology i had used was wrong and would not have given me edge loops in the correct places, in order for me to create the shape i need. I therefore had to completely channge the Topology for the head model.
Wednesday, 26 October 2011
Blending Basic shapes
To make a start to understanding how blend shapes work, I have made some basic shapes which i will then blend, in order to be able to animate between them. I found a basic tutorial to teach me the tools needed. http://www.youtube.com/watch?v=8dS0dcULRBA
 I was thinking about mouth movements, so decided to make shapes that could represent what i'd like to do with a mouth on a proper head model.
I started by naming each one so that when it comes to blending between i know which control will do what.
Here i have: open, wide, high, and slanted.
 After selecting the three on the right I then finally selected the Open shape, in order to have that as my base model.
Using the animation tab i was able to go to create Blend Shape.

Using the Blend Shape editor I am able to use the sliders to change the shape of my base model.
Here i have moved all of the sliders at the same time to create a completely new shape.
Through this editor i am also able to key the movements, and therefore create animation of the model changing shape.
Already I can see how this will be of great use when it comes to rigging a face in order to create facial expressions. However creating expressions that look natural or right for the film could be difficult.

I started by naming each one so that when it comes to blending between i know which control will do what.
Here i have: open, wide, high, and slanted.

Using the animation tab i was able to go to create Blend Shape.

Using the Blend Shape editor I am able to use the sliders to change the shape of my base model.
Here i have moved all of the sliders at the same time to create a completely new shape.
Through this editor i am also able to key the movements, and therefore create animation of the model changing shape.
Already I can see how this will be of great use when it comes to rigging a face in order to create facial expressions. However creating expressions that look natural or right for the film could be difficult.
Monday, 24 October 2011
Blend Shapes
After doing some further research, I have decided to look into Rigging instead of ZBrush. Rigging seemed like it will be more useful to me this year. Therefore i will be looking into ways to rig the character which i am currently modeling.
When looking for tutorials for maya I often go to www.Lesterbanks.com , I use these because the tutorials on here although most from outside sources, come recommended. Normally just typing what you want into youtube ends up with so many videos that it's often hard to find one that is actually informative as well as easy to follow.
Having been told about Blend Shapes but not having any real knowledge of what they are, I decided to look here first to see if there were any videos which could be of use. The following was there http://lesterbanks.com/2011/01/maya-blend-shape-workflow-part-1/
I have found that by using different heads each with different facial expressions I can use controllers to create effective animations that use each extreme pose and anything in between. The technique seems to suit the character I am currently working on. The character is very cartoony and the poses will need to quite extreme in parts. Blend shapes allow me to exactly model the shape of face I require. Opposed to rigging the face with joints, which may limit the movement in the expressions.
I am keeping the model for the face relatively low poly to enable me to easily manipulate the mesh when needed to create further expressions.
I am in the process of building a character head which I can practice with. However until i have this, I will be using basic shapes to learn the tools needed. I am hoping that by learning the basic principles of blend shapes first, that when I come to apply it to an actual head the process will be clearer for me.
Monday, 17 October 2011
Subscribe to:
Posts (Atom)